
|
|
|||||||
| D3 - Sat Nav, ICE, Audio & TV All in car entertainment discussions |
 |
|
|
Thread Tools | Display Modes |
|
#61
 16th April 2016, 10:07 AM
|
|||
|
|||
|
Fitted my unit this morning with the assistance of the instructions from the OP.
Thought I would add some pictures for the benefit of others; I don't know about you but I much prefer a visual reference - maybe that's just me. The wiring is as per the OPs instructions, so I wont repeat them here. I think this job is much easier with the chair out the way - so start by unbolting the passenger seat. Slide the chair right back and remove the plastic covers off the end of each rail. These have a little circular tab holding them on the inboard side of the rails. get your fingers or screwdriver underneath these and pop them free. Then insert screwdriver at the top and gently push forward (for front, backwards for rear). Obviously move seat forward and repeat process for two more bolts on rear.  You can see better in this pic they're slotted - take care to align properly when refitting. This one has been squished by someone a little at some point (not me, honest!) 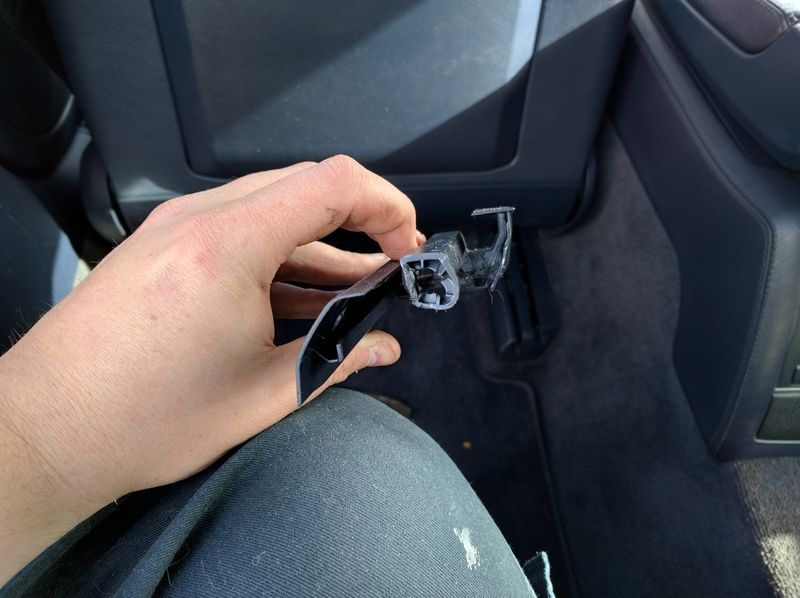 Once seat unbolted move to roughly the centre and tilt the back as far forward as it'll come - them simply tilt the entire chair backwards so it leans on the rear bench - it'll be plenty out your way by that point. Next the sill trim comes off. You can see in this pic the two locating holes in the chassis. these are next to the silver tabs for the metal plate - note that one of my clips has remains in the hole at the front. See the blue trim by my right knee has a clip hole in it too. Lift it from the back, only gently it comes easily, and as it comes up towards the front it comes back slightly to remove. 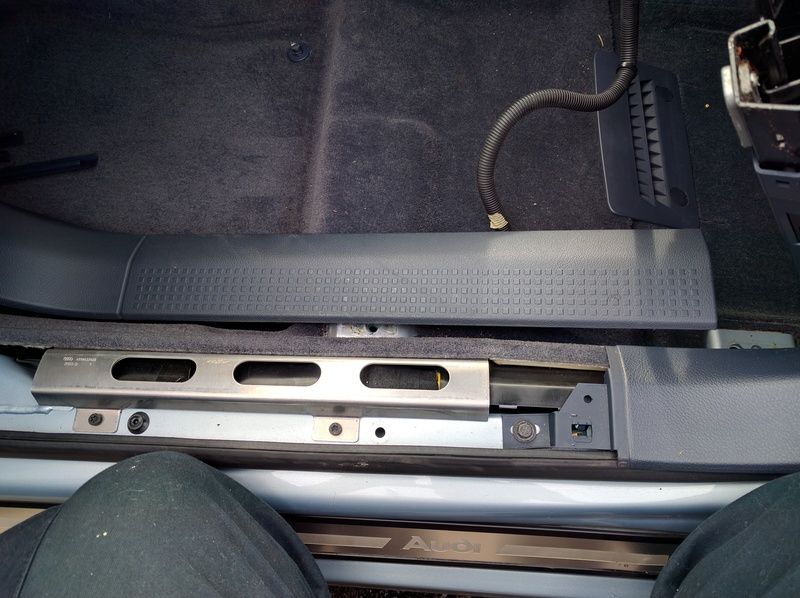 You can then pull up the carpet. See the above pic there is a vent in the middle of the floor - note the carpet is split at this point. Untuck the carpet from the trim by my right knee and then peel it out from the vent. It's only tucked in, curl the carpet back towards the front of the car to remove from the vent. You can then pull the carpet up to reveal the plastic black box that the telecoms box is in. 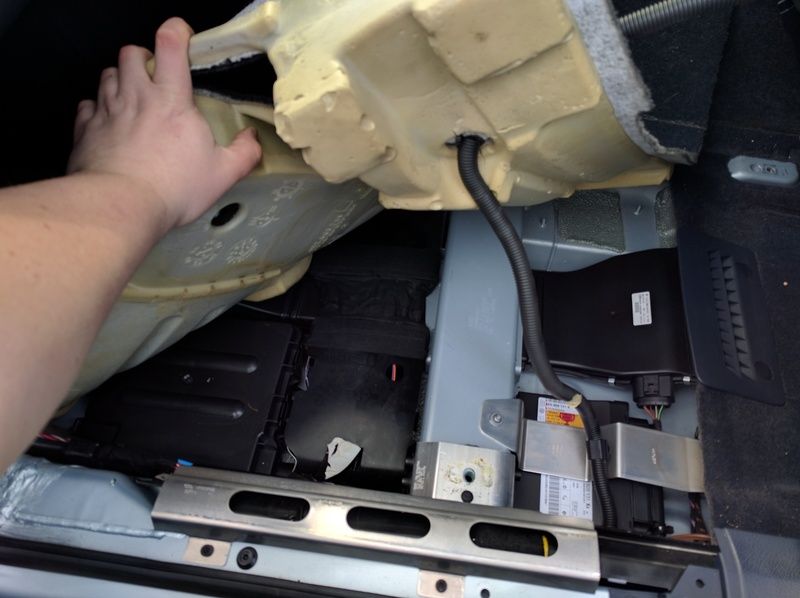 My box wasn't bolted down but it does sit on some threaded studs. you're going to want to pull the box up at the nearest the chair and the centre side to move it out as it's tucked under the sill very slightly which stops you from opening the lid. Once you've lifted it there are two tabs on either side and two clips at the rear side. Undo the tabs (they are brittle, one of mine broke but it's no great loss). Then undo the clips at the rear side. The lid the hinges towards the front of the car. I just unclipped the lid from the hinges and set it aside for ease. You're then free to manipulate the old unit however you wish. 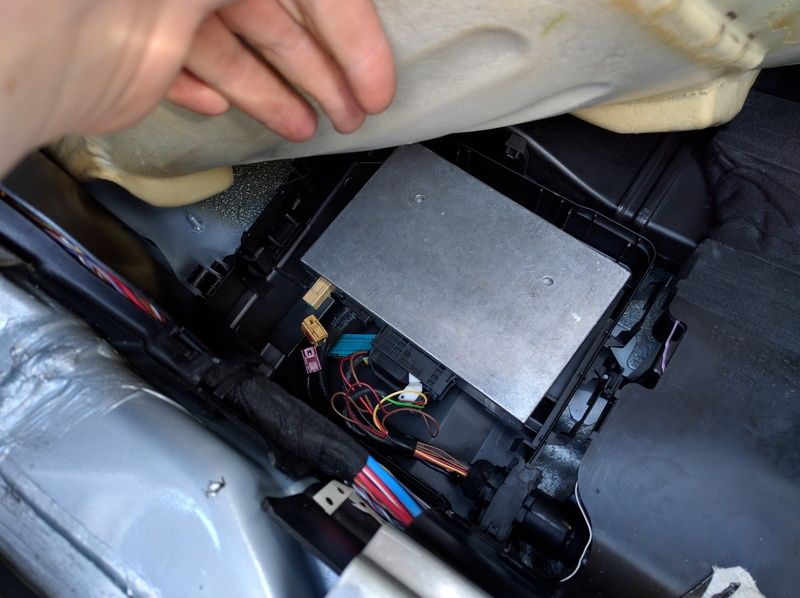 Remove the wiring harness first to prevent anything shorting or browning out. Then remove the MOST and antenna cables. Lift the box free from the car. 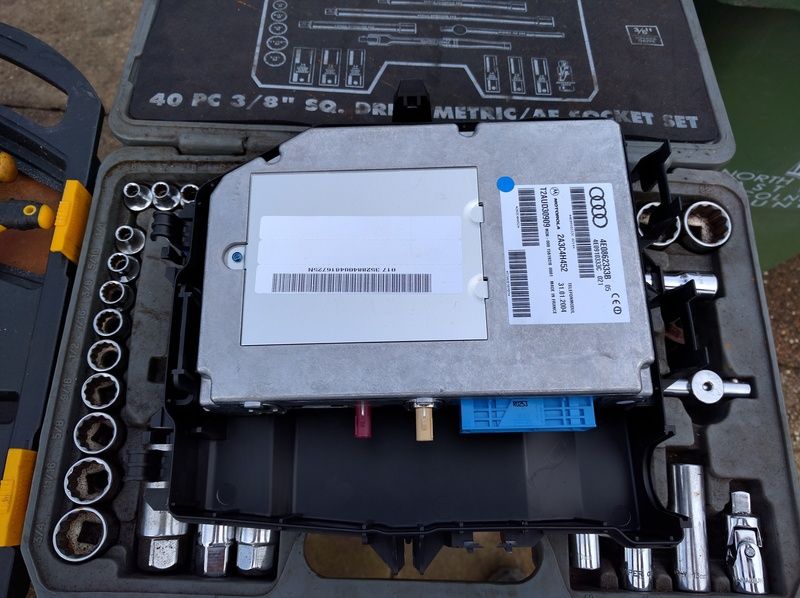 See on the left of the photo there is a tab that holds the old telecoms unit in place, as it tucks under a lip on the right side. You have to get pretty darn firm with it to remove but go big on it and it will come out. Next wiring. 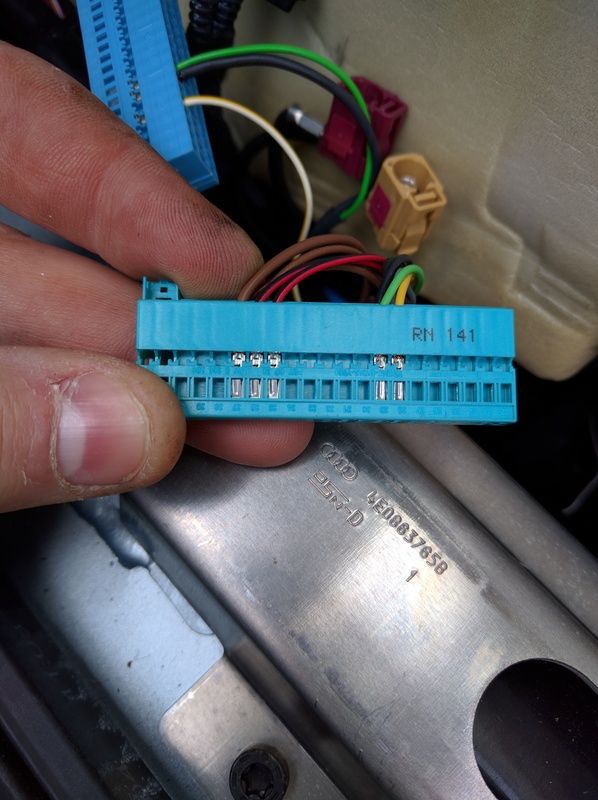 Old block in my fingers, new block just above my hand. Wiring locations are covered by OP so follow those. To remove the pins from the old block poke the bottom hole which has a barb on the connector and pull gently up from the block. I poked with a safety pin. Obviously unless you disconnected the battery (I didn't, naughtly me!) be careful not to short the positive wire. The rest aren't a great concern but take care regardless. The barb on the pin doesn't get used on the new block, the connector has a rib in the body that once the block is inserted holds the pins in the block, so don't worry about folding the barb back out. This pic again.... Yep, that's because that's actually the 'new' box in place not the original. Note that the BT antenna has to sit to the front of the car as the rubber grommet for the wiring harness fouls otherwise. At this point I hit the ignition and rebooted the MMI to see if it was all OK. It was and I could pair my phone, so anything else would just be VCDS programming and I can bolt her back up. In that case you can fit the base of the box back up and reconnect the lid. As in most scenarios refitting is the reverse of the above. Don't seal the box lid until you've seated the base of the box and located the grommet correctly, then snap the lid shut. Then proceed normally. Probably only other thing I would add is that the plastic edges on the box and things around it can be a bit harsh, I've got a cut and couple of grazes from a bit of man handling of it - not that I'm being a pussy about the situation but if you've got a lighter coloured interior don't bleed on it! Enjoy. Last edited by Artermis; 16th April 2016 at 10:17 AM. 
|
|
#62
16th April 2016, 10:29 AM
|
|||
|
|||
|
Nice write up

__________________
Matt 2004 A8 3.7q, 1998 A4 2.8q, 1994 Coupe 2.8q SORN,
|
|
#63
16th April 2016, 12:05 PM
|
||||
|
||||
|
Thanks for taking the time to add that in
__________________
For parts enquiries and Forum User Administration please contact customer services directly, not me  - enquiry@a8parts.co.uk, www.a8parts.co.uk, or call 01642 783537 - enquiry@a8parts.co.uk, www.a8parts.co.uk, or call 01642 783537The Daily Town Car - 2023 Tesla Model Y Performance. Black with Black. Giant ipad screen, huge sunroof, 4 wheel drive, Tow bar, lots of ooomph and made in China, so actually built properly unlike the Californian ones. The Family Wagon - 2018 Tesla Model X. Black, 7 Seats, Towbar, Homelink, Enhanced Auto pilot with Summon and self park, Heated front seats, CCS Charger upgrade, MCU2 Upgrade, Falconwing Doors, Self opening / closing doors, Netflix, Spotify, toys, Air suspension, alcantara roof + lots of other stuff...... The 17 year old Driver Wagon 2015 Skoda Citigo Monte Carlo. Alloys, Power steering, Aircon, Leccy windows, Sat Nav, bluetooth, central locking, cup holders, 59 whole bhp. Million times better than my first car. Well jealous..... The First 20 Audis: 2001 D2 4.2 QS Silver, 1997 D2 S8 Silver, 1999 D2 4.2 Silver, 2002 D2 S8 Dolphin Grey, 2003 C5 RS6 Blue, 1998 D2 S8 Black, 2000 D2 4.2 QS/S8 Ming Blue, 2003 D3 4.2 Ming Blue, 2005 B7 S4 Blue, 2006 D3 3.0 Tdi Black, 1999 D2 4.2 Silver, 2003 D3 4.2 LPG Crystal Blue, 2000 D2 S8 Silver, 2007 3.0 Tdi Q7 Black, 2009 B8 S4 Black, 1998 D2 S8 Agate Grey, 2006 D3 4.2 Tdi Blue, 2006 D3 S8, 2007 Q7 3.0 Tdi, 2006 C6 S6, The Second 20 Audis: 2011 A7 Sline, 2001 A2 1.4 Tdi Black, 2002 A2 1.4 Tdi Silver, 2006 A8 4.2 Tdi Blue, 2007 4.2 Tdi Q7, 2006 S4 Cab Silver, 2010 RS6 Saloon Black  , 2007 TT Roadster, , 2007 TT Roadster, 2010 A8 D4 4.2 Silver, 2006 C6 A6 2.7 Tdi Quattro, 2000 D2 4.2 QS/S8 Ming Blue (again), 2008 Q7 4.2 Black, 2009 C6 RS6 Saloon Daytona Grey, 2001 Fully Loaded A2 Tdi, 2006 Avant S6 Black, 2007 VW Caravelle Exec Black (almost an Audi) 2009 TT Roadster Daytona, 2015 Q7 4.2 tdi lava grey, 2002 GmbH D2 demonstrator, 2006 D3 A8 LWB 4.2 Tdi Black Most Recent Audis: 2001 A2 1.4 Tdi Black, 2007 4.2 FSi Q7 ABT Blue, 2016 S5 Coupe Launch model, 2004 S4 B6 Cabriolet, 2016 Q7 Sline White, 2006 Q7 4.2 FSi Black, 2012 Q7 Sline+ 4.2Tdi White, 2008 Blue Audi S8 Everything Else 1989 Subaru Justy, 1986 Vauxhall Cartlton 2.0 GL, 1985 Vauxhall Carlton 2.2 CDi, 1987 Ford Sierra XR4x4, 1983 Vauxhall Senator, 1985 Vauxhall Senator 3.0i, 1997 Polo Saloon, 1997 Peugeot 306 1.9 TDi, Ford Sierra Sapphire 2000E, 1990 Subaru Justy, 2000 Subaru Impreza, 2000 Subaru Impreza RB5, 1993 Range Rover LSE, 2005 VW Bora, 2003 Skoda Superb, 2003 VW Passat V6 4 Motion, 1996 Peugeot 106, 2000 Range Rover 4.0, 2019 Tesla Model 3 Performance
|
|
#64
16th April 2016, 09:10 PM
|
||||
|
||||
|
Great write up.
I did exactly that a while ago, but instead of taking the seat off, I removed the plastic sill covering and pulled the carpet back from the front. Mike
__________________
 04 A8 - 4.2 Sport Indigo Leather Sports Seats - Sports wheel - Sports Air Suspension Auto Boot - Double Glazing - AMI - Solar roof TV - Bose - Voice Control - TPMS - AFS- TINT Power Blind, Fingerprint - Light package (in and out) Retrofits: OEM Auto headlights & rain sensing wipers OEM Bluetooth phone Bluetooth Audio Streaming Reverse Camera OEM Aluminium Package Auto boot close using remote/door button
|
|
#66
20th April 2016, 07:26 PM
|
||||
|
||||
|
Another one here who also never messed with the seat, just removed the kick panel and pulled the carpet up, good write up none the less
__________________

|
|
#67
21st April 2016, 12:13 PM
|
|||
|
|||
|
Quote:
The ECU you retrofitted was supplied with that 'BT stick' for cars that didn't have a pre-installed BT aerial ... Julian
__________________
Audi A8 3.0TDi MY2016 in Nautilus Silver. Audi A8 3.0TDI MY2005 in Midnight Blue. Gone since 2018, after 10 years!
|
|
#68
21st April 2016, 01:02 PM
|
|||
|
|||
|
I believe you are correct but in the interest of certainty I fitted as the unit was known to work with that particular antenna as it came with my replacement module; the original phone kit in the arm is being removed for maximum storage.
Rather than risking connectivity and have to open it all up again I fitted first as last, as wasn't sure if removal of the phone kit affected the antenna in the arm (I fitted new module before removing old phone kit).
__________________
Current: 2004 D3 4.0 TDI V8 in Crystal Blue. Factory: finger print, tv, xenons, keyless entry & go, soft close boot, 19s, and probably lots more besides Done: fixed headlight washer leak, fit Bluetooth in place of factory phone To do: DAB, DTV, fix soft close boot, get a spare key, investigate NSF bushes,
|
|
|
|


 Linear Mode

