
|
|
|||||||
| D2 - Engine Bay Everything under the bonnet |
 |
|
|
Thread Tools | Display Modes |
|
#1
 10th May 2009, 11:48 AM
|
||||
|
||||
|
The thread is locked until this post is complete as I know that as I start I will get sidetracked!
 More accurately this thread should be called: Engine and Gearbox Removal First and foremost this is not how Audi do it in their workshop manuals. This is how I would do it next time having removed 3 engines and gearboxes and replaced and refitted one. Mine!  It is how I would do it if I didn't have a car lift. Having done my own, by choice I would not now try to remove the engine or gearbox alone but would remove both together. It may be a bit long winded, but one person can do it on their own with occasional help. You don't need a lift (but a 2 pole lift would make this so much simpler and quicker), you don't need a hoist. What you do nee is the ability to pull the engine and gearbox forward away from the car once all is disconnected. I was lucky and had access to a handrolic forklift device: 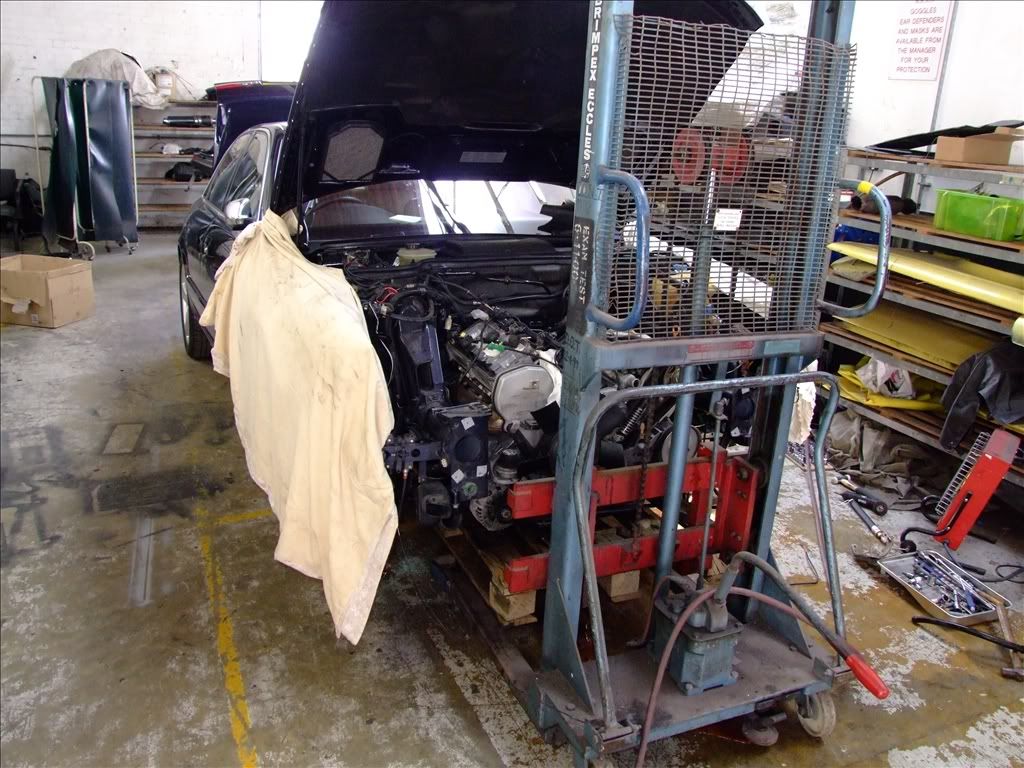 However a pallet truck would do as would a real forklift and actually if you had a trolley that can take the weight and alow you to roll it out from the front of the car. So what else do you need? Consumables: Your going to disconnect a few gas and liquid services so gaskets and seals are the order of the day. The minimum you'll need are: Transmission connections to the radiator = 2 x 'O' seals. Air Con pipe connections to the radiator = 2 x special 'O' seals. Air Con pipe connections to the compressor = 2 x special 'O' seals. You could get away with just the one from the compressor to the condenser/dryer but I removed both from the compressor to stop me damaging it during the process. Power Steering pump = 4 seals (2 for each banjo bolt) And that's it. You may need more dependant on the work you do. If you split the gearbox from the engine you will need the torque converter mounting bolt (3 or 6 dependant on year and model) as they are an always replace item. Theoretically you should also replace all bolts and locking nuts with new. I tend to replace locking nuts, but reused the rest with the addition of thread lock. Don't do as I say, do as I should do!  Other consumables you may need: 1 Ltr ATF (I caught about 1 Ltr of ATF from the radiator and Torque Converter. It was in resonable condition (19k done) but I put new back anyway). 1.5 Ltrs of Antifreeze G12++ (made up to 3 Ltrs with water) Again I caught 3 or 4 Ltrs when I drained the radiator. The block was not drained as you have to undo plugs in the sides and let it run down the block. I think this would contaminate it so i had some ready for the replacement engine which was empty. 1 Ltr (2 Ltr) power steering fluid. I did a full flush as I hadn't done one before. I lost about 300 ml so have some handy. Location: Some where flat and long enough so you can pull you Lump and box clear of the front. Equipment: Spanner open and ring from 8 to 24mm Crows foot wrenches if you can get them. (there is one bolt that you can't get a torque wrench and socket on during reassemble). Sockets 8 to 24mm. (1/2, 3/8, 1/4 and extension bars, uv joint and a BIG Breaker Bar) Torx sockets 40 to 55 Allen Sockets 5 to 17mm Triple Square sockets 5 to 12mm Torque Wrench(s) 5Nm to 200Nm Screwdrivers various Phillips and Flat Blade Soft face Mallet (lead if you can) Engineer's hammer 2 x adjustable spanners Mole Grips The Process: I'm not going to do a nut by bolt by screw monologue, just the sequence of events. I'm not going to give much technical detail as I don't want you tightening up you nut on an ABZ V8 to the torque for the same nut on my AHC V8 in case they are different. Its all in the technical manual. So lets start. First off safety. Don't work under a car that is not on axle stands. Jacks just aren't safe. Make sure you know your radio code. Disconnect the battery. A précis of the process. Using FGB breaker bar, crack the half shaft nuts at the hub carrier. Get the body on Stands and level. Remove the front bumper. Remove headlights. Disconnect ATF lines, Aircon Lines, Power Steering Lines at radiator. Drain radiator and disconnect pipes. Remove radiator. Crack half shaft to gearbox bolts by inserting screwdriver in brake disk vent holes. Disconnect front lower control arm at subframe. Disconnect rear lower control arm at hub carrier. Remove Cat back exhaust in it entirety. Disconnect prop shaft at gearbox. Disconnect engine wiring loom at ECU/TCU housing and at ignition amplifier / MAF. Disconnect water pipes at reservoir and at heater. Disconnect power steering pump from reservoir and steering rack. Disconnect AC compressor from condenser/dryer. (remove pipe from compressor to radiator to save snagging it) Disconnect Alternator (2 terminals). Remove Alternator air cooling pipe if fitted. Disconnect battery cable to starter motor at drivers side chassis rail. Disconnect earthing strap at drivers side chassis rail. Once all's disconnected its time to put your forklift/pallet truck/trolley under the engine. Either take the weight of the engine by lifting it slightly or lower the body until the engine rest on your trolley. Undo the 4 subframe securing bolts and the six bolts (3 on each plate on the rear mounting points of the subframe. Once there out, lift the body or lower the engine to clear the chassis rails and pull forward until lump and box are clear. Re-installation is, as they say, the reverse of removal! So maybe a bit more detail? Using FGB breaker bar, crack the half shaft nuts at the hub carrier. I took my wheels off and popped out the centres and put the back wheels on lowered the car onto the ground the used a FGB breaker bar and socket with a supporting scaffold pole to break the torque on the half shaft bolt. Get the body on Stands and level. Got to do this so the engine and box comes out without the box snagging on the tunnel. Remove the front bumper. Pop out the grills and remove the 2 allen bolts. Pull slightly forward and release the inner wheel arches then take bumper off. Remove headlights. Disconnect all electrical connections at the back. 2 machine screws at the top and 2 self tapers underneath and out they come. Disconnect ATF lines, Aircon Lines, Power Steering Lines at radiator. ATF lines into the radiator are held in by 5mm allen bolts (3). Undo then use a flatblade screwdriver to lever out the 2 connecting points. There is only a small amount of spillage. I blocked the ends of the pipes with the fingers from the latex gloves I was using and some elasitc bands. Power steering lines are disconnected by destroying the clips. Replace with jubilees. You will get the reservoir draining so be ready to catch it. there will also be some from the radiator and the power steering pump as you remove the pipes from it. Aircon lines can't be removed until you have had the gas sucked out. You will need 2 spanners of adjustable's to hold the radiator mouthing point while undoing the connections. BE READY TO CATCH THE LUBRICANT THAT COMES OUT IN A VERY CLEAN CONTAINER. This will go back in when you connect it all back up. You will get quite a bit out of the compressor when you disconnect the connections there as well. Keep it all very clean. Drain radiator and disconnect pipes. Drain the coolent by opening the stop kok (sp) on the bottom passenger side by the aircon connections. Put a hose (10 to 12mm) over the drain and catch it all. Remove the plugs either side of the block and drain the block into a tray. I ditched this as it was a bit contaminated. Remove radiator. Undo the 6 bolts(3 either side) onto the chassis rails. With another pair of hands after disconnecting the electrical connections to the outside temperature sensor, water temperature sensor and AC high pressure switch, undo the 2 bolts at each wing and lift the radiator clear. Tip the top forward and you'll not spill any fluids. I blocked all holes with paper and laid it flat on its front. Crack half shaft to gearbox bolts by inserting screwdriver in brake disk vent holes. Take off the wheels if not already done. Insert a screwdriver in the vent holes of your disk so it jams against the calliper and undo the 6 bolts in the inner flange of the drive shafts. Torx 55 if I remember. Take out bolt from hub carrier. Disconnect front lower control arm at subframe. Undo the nut and remove the bolt. Take off the 'C' link from the anti roll bar. Remove the bolt from the bottom of the strut. Disconnect rear lower control arm at hub carrier. Undo the nut at the hub carrier until the nut is level with the top of the thread. using a lead faced hammer give it a v sharp tap and it should pop. Undo the nut and push the ball joint out. Remove Cat back exhaust in it entirety. Disconnect just behind the cats and unhook the 4 suspended rubbers, 2 at front box and 2 at the rear. Wiggly it backwards until clear. You may have to cut the connection piece bolts. Disconnect prop shaft at gearbox. Remove the guard which is feckin fiddly. Mark up the prop to box flange with some paint all the way across so you can line it up when you reassemble. Using a screw driver to stop the prop rotation by wedging it between 2 bolts on the flange crack all six nuts (m8 hex socket bolts). Once cracked remove bolts and find some way to hang propsaft inside the tunnel. It must not be allowed to bend more than 25 degrees from true as damage will occur at the central UV joint. I cable tied mine to the gear change cable where it entered the tunnel.
__________________
Conan (the Librarian) Watch it if you dare Currently, 2000 S8, Merlin Purple, Leather Pack 1, Winter Pack 1, SPAX adjustable suspension, AP Racing 6 pot front caliper, 385mm fully floating disks, EBC Yellow Stuff Pads, Black Diamond grooved rear disks and predetor pads, D2 Doctors Brake Block. 1997 4.2 A8SQ - the Projekt. 12 years and ongoing! 1997 4.2 A8SQ - Ming Blue. Restoration sat waiting; saved from the Scrapyard 2003 C5 Allroad 4.2Q - Cobolt Blue. Towing car. Laid up awaiting manual conversion. 2005 C5 Allroad 2.5TDi FE - Grey - Workhorse. 2015 Q3QS SLine - Daytona Grey. Lots of extras! Long Haired Admirals cutter. Previously 2003 C5 A6 1.9TDI FWD - Loaner from D2 Doctor Lifex 1997 S8 - Ming Blue. Loaned out and written off. I loved that car. My first engine swap after cambelt failure. 1996 4.2 A8SQ - Ming Blue. 178k on a cambelt! Trader's 8. Delivered to A8Parts at Lifex. 2003 2.8 A8SQ - powder blueish. Fill in for a while. Sold on. 1998 1.8T A4 Avant FWD. Ming Blue (there's a theme here), PEX for the 97 S8. And a list of non VAG going back 40 years before I saw the light.
Last edited by Conan_the_Librarian; 18th May 2009 at 06:25 PM. |
|
#2
18th May 2009, 06:23 PM
|
||||
|
||||
|
Part 2!
Disconnect engine wiring loom at ECU/TCU housing and at ignition amplifier / MAF. Having removed all the plastic covers in the engine bay, take off the air filter housing lid and pop the connector off the MAF. Ease out the rubber grommet and set the lid and maff aside. Follow this part of the loom back disconnecting all connectors until it jumps to the block. here there is a 'P' clip with an 8mm nut on the bulkhead. Undo this and this section of the loom can be laid on top of the engine. Take the cover off the ECU housing and remove the 2 self tappers that hold in the TCU at the front. Red Lines... 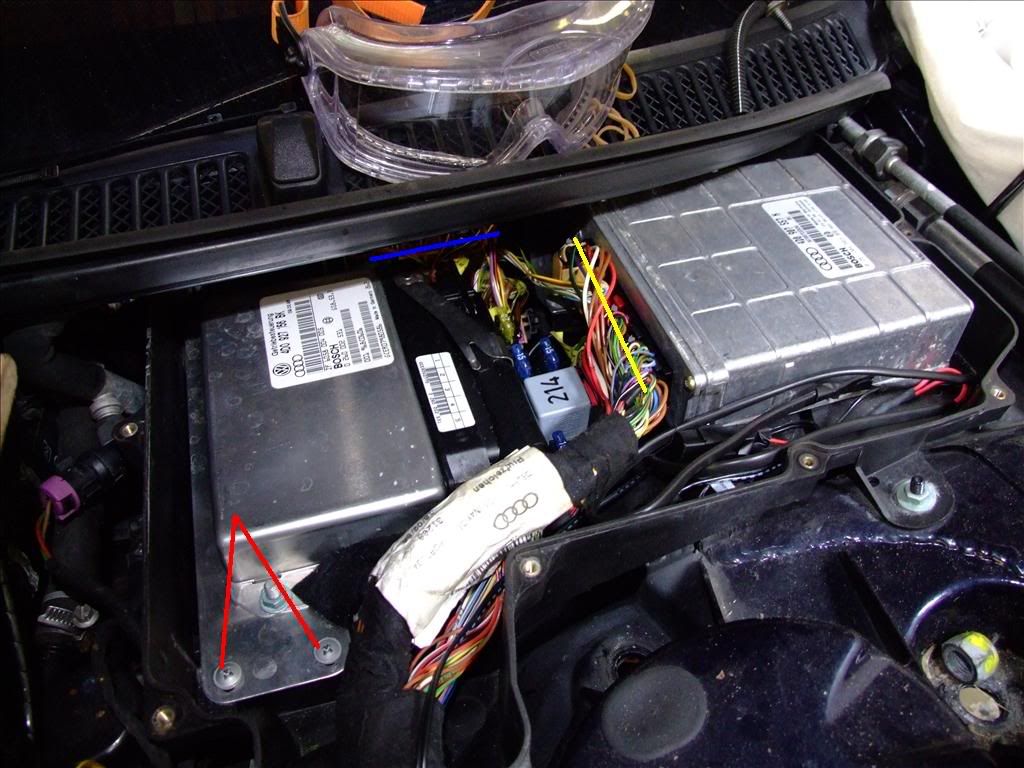 Remove all the connectors under the yellow line, take out TCU and remove all connectors under the blue line. Slide up the rubber grommet where it enters the box. Mine had some rubber solution soft glue on it. When I replaced it I used something similar. Lift the edging strip that runs across the separator bulkhead and pass the loom underneath and lay on top of the engine. Robert is you Aunties brother. Disconnect water pipes at reservoir and at heater. Once again the clips may have to be destroyed if they are pinch clips. replace with jubilee clips. the reservoir is held in by a couple of self tappers. Lift it out of its bracket and disconnect the hoses. You can do this at either end of the hoses but the reservoir is best. The 'T' connection in the radiator hose can be very fragile. Snap the plastic pipe here and its a new top hose. Disconnect power steering pump from reservoir and steering rack. Two banjo bolts here on the pump. tie the pipe to the rack back with a cable tie. there may be a bit of fluid in the pump so stand by to catch it. Disconnect AC compressor from condenser/dryer. (remove pipe from compressor to radiator to save snagging it) 2 x 5mm allen headed bolts and lever out the connections with a flat blade screwdriver. Make sure the whole area is scrupulously clean before you start as you will need to collect the oil that comes out as it will go back into the pump. You can't buy this oil from Audi and each pump make has its own oil. Disconnect Alternator (2 terminals). Simply 2 nuts of the back. Put the plastic cap somewhere safe. Remove Alternator air cooling pipe if fitted. 2 x self tapers hold the ducting to brackets, Once removed it all just clicks apart. Disconnect battery cable to starter motor at drivers side chassis rail. Underneath the drivers side chassis rail you'll see a black plastic box if you are lucky. If not the lid has fallen off and all you may see is corroded copper terminals. there will be some corrosion of the wire no matter what. Undo the 2 nuts (live and earth) and separate the wires. It's all pretty self evident. Disconnect earthing strap at drivers side chassis rail. As above. Once all's disconnected its time to put your forklift/pallet truck/trolley under the engine. If the body is jacked up and you can get a pallet under the subframe and you forklift/pallet truck then I would recommend using one. Pump it up until the weight is starting to come off the jack stands. Make sure the subframe bolts are accessible. If you are using a trolley. Then once it is in place you will have to lower the body until the weight come on the trolley.Once the weight is on. Undo the 4 subframe bolts with a big breaker bar.Remove the six bolts on the 2 plates at the rear sub frame mounting points. Checking round the engine as you go, either lift the body, or lower the engine until the exhaust manifolds are clear of the chassis rails. You can the move the engine forward and clear of the body. Now wasn't that easy!
__________________
Conan (the Librarian) Watch it if you dare Currently, 2000 S8, Merlin Purple, Leather Pack 1, Winter Pack 1, SPAX adjustable suspension, AP Racing 6 pot front caliper, 385mm fully floating disks, EBC Yellow Stuff Pads, Black Diamond grooved rear disks and predetor pads, D2 Doctors Brake Block. 1997 4.2 A8SQ - the Projekt. 12 years and ongoing! 1997 4.2 A8SQ - Ming Blue. Restoration sat waiting; saved from the Scrapyard 2003 C5 Allroad 4.2Q - Cobolt Blue. Towing car. Laid up awaiting manual conversion. 2005 C5 Allroad 2.5TDi FE - Grey - Workhorse. 2015 Q3QS SLine - Daytona Grey. Lots of extras! Long Haired Admirals cutter. Previously 2003 C5 A6 1.9TDI FWD - Loaner from D2 Doctor Lifex 1997 S8 - Ming Blue. Loaned out and written off. I loved that car. My first engine swap after cambelt failure. 1996 4.2 A8SQ - Ming Blue. 178k on a cambelt! Trader's 8. Delivered to A8Parts at Lifex. 2003 2.8 A8SQ - powder blueish. Fill in for a while. Sold on. 1998 1.8T A4 Avant FWD. Ming Blue (there's a theme here), PEX for the 97 S8. And a list of non VAG going back 40 years before I saw the light.
Last edited by Conan_the_Librarian; 24th May 2009 at 08:13 AM. |
|
#3
24th May 2009, 08:17 AM
|
||||
|
||||
|
Removal Complete. Next up Re-installation, which of course is the reverse of removal. Ooooorrrr is it?
 I have started a discussion thread here for any questions or whatever.
__________________
Conan (the Librarian) Watch it if you dare Currently, 2000 S8, Merlin Purple, Leather Pack 1, Winter Pack 1, SPAX adjustable suspension, AP Racing 6 pot front caliper, 385mm fully floating disks, EBC Yellow Stuff Pads, Black Diamond grooved rear disks and predetor pads, D2 Doctors Brake Block. 1997 4.2 A8SQ - the Projekt. 12 years and ongoing! 1997 4.2 A8SQ - Ming Blue. Restoration sat waiting; saved from the Scrapyard 2003 C5 Allroad 4.2Q - Cobolt Blue. Towing car. Laid up awaiting manual conversion. 2005 C5 Allroad 2.5TDi FE - Grey - Workhorse. 2015 Q3QS SLine - Daytona Grey. Lots of extras! Long Haired Admirals cutter. Previously 2003 C5 A6 1.9TDI FWD - Loaner from D2 Doctor Lifex 1997 S8 - Ming Blue. Loaned out and written off. I loved that car. My first engine swap after cambelt failure. 1996 4.2 A8SQ - Ming Blue. 178k on a cambelt! Trader's 8. Delivered to A8Parts at Lifex. 2003 2.8 A8SQ - powder blueish. Fill in for a while. Sold on. 1998 1.8T A4 Avant FWD. Ming Blue (there's a theme here), PEX for the 97 S8. And a list of non VAG going back 40 years before I saw the light.
Last edited by Conan_the_Librarian; 24th May 2009 at 09:16 PM. |
|
|
|


 Linear Mode

