
|
|
|||||||
| Spotless For all your cleaning discussions.... |
 |
|
|
Thread Tools | Display Modes |
|
#1
 1st January 2013, 08:10 PM
|
|||
|
|||
|
For some time now I have been wanting to restore the passenger Headlamp Lens to match the newer Drivers side one.
As this was a DIY I have made an " Idiots Guide " to how to and decided to include the Fog Lenses as they are really looking shabby.... Besides the usual tools I only had to purchase various grades of water paper (abrasives) and a bottle of Meguairs PlastX. Started with this ..... after in-situ sanding of the outer face of the lens. 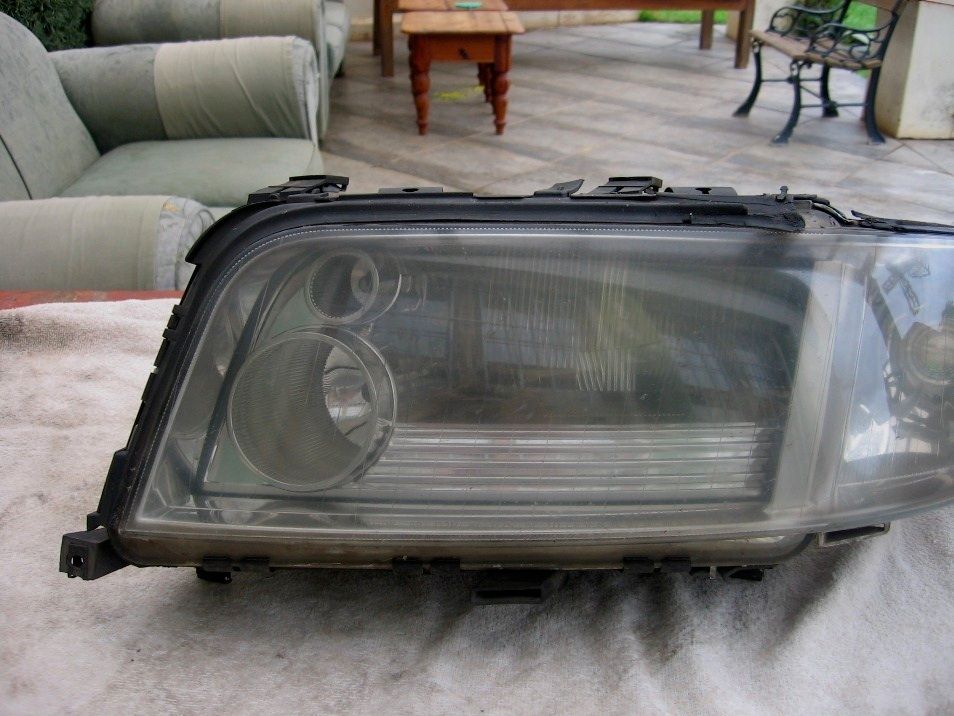 And ended up with this..... Final mechanical polish to follow.... 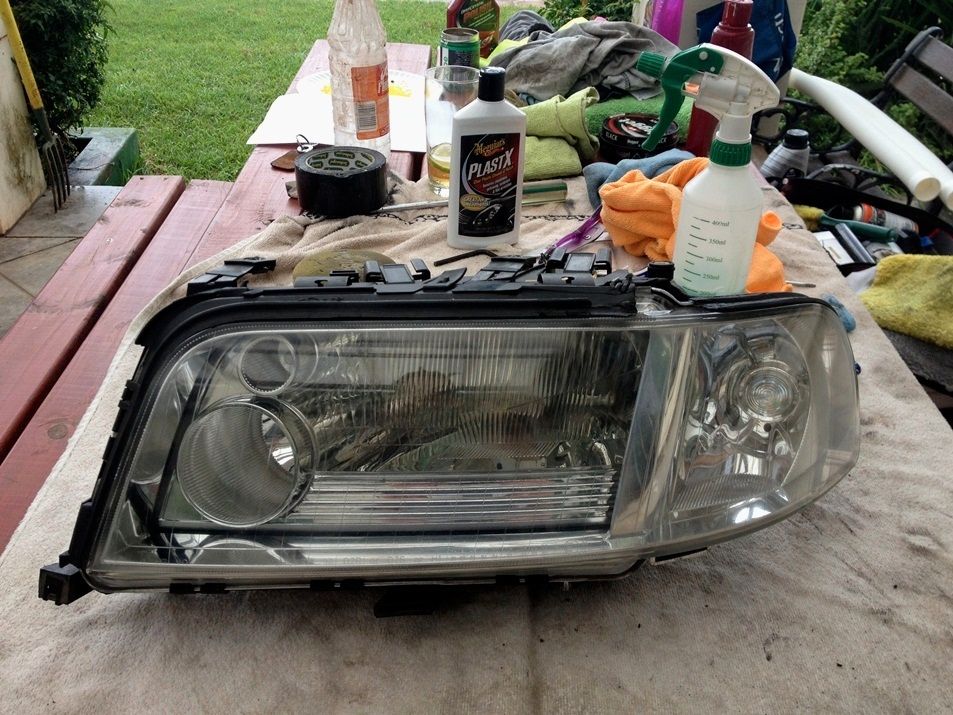 The grades of water paper/abrasive pad used are as follows .... Pad 280, Paper 400/800/1000/1200/1500 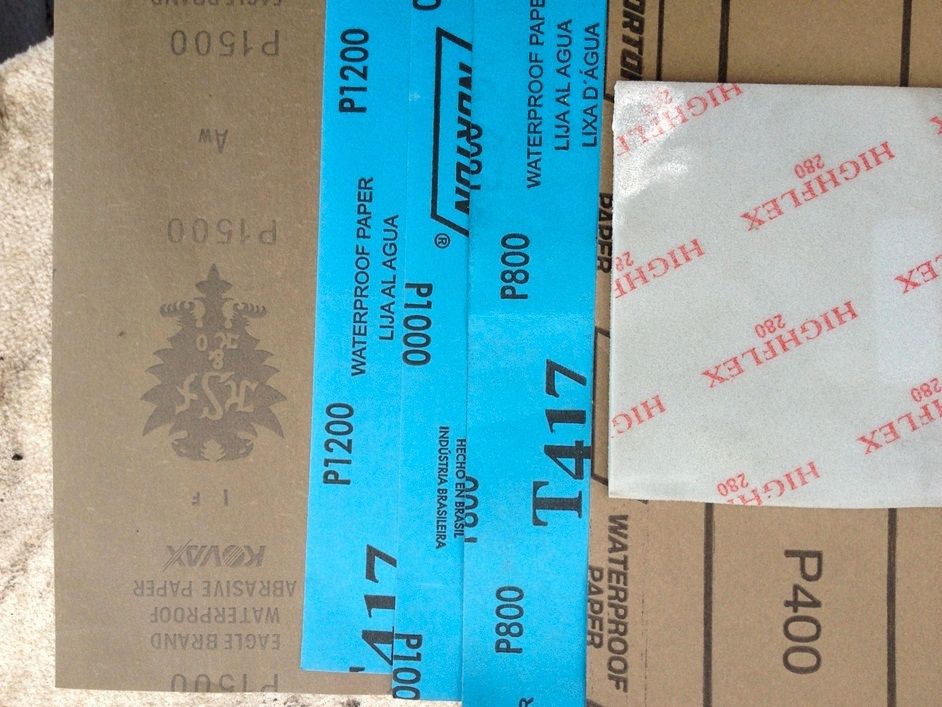
__________________
 " Love the Sound of a V8....... All Day " *still wish it was a V10* 2002 S8 D2 F/L H & R Springs, Koni Coil Overs, Dastek Chip, Sport Exhaust, 19" S5 Rims, Solar Sun Roof (Cause we have Sun) and most of the Bells & Whistles. 
|
|
#2
1st January 2013, 08:29 PM
|
|||
|
|||
|
Step 1 ....... masking around the Headlamp to protect the paint work and open bonnet to save additional masking ....
 Step 2 ........ Dry sand with the 280 Pad ..... to remove the worst of the stone chips etc ....  Step 3 & 4 ...... Wet Sand with 400 & 800 .... 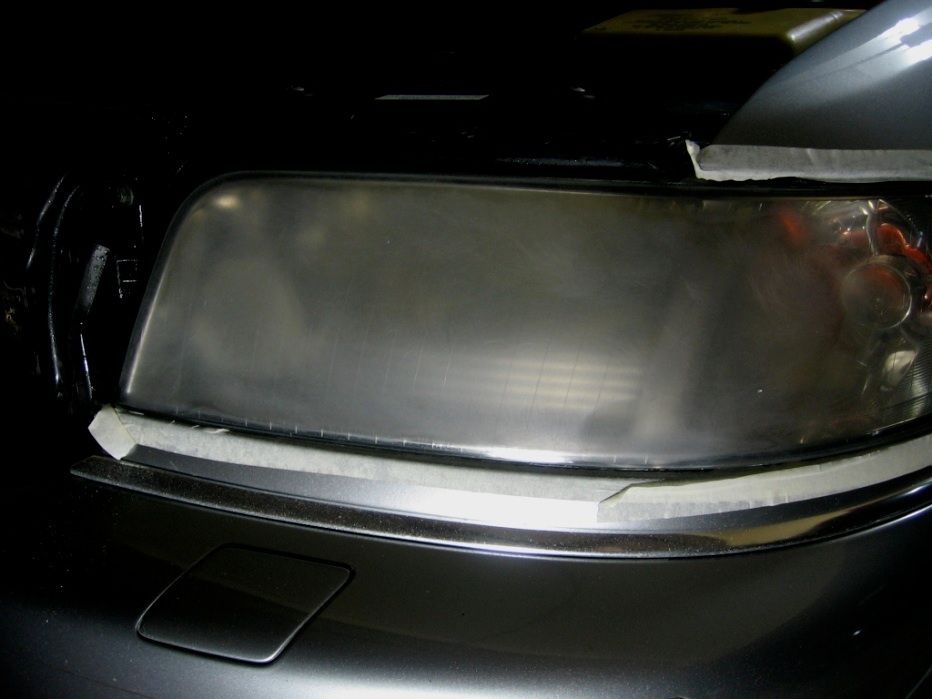 Step 5 & 6 ....... Wet Sand with 1000 & 1200 .....  Final Step before removing Headlamp was Wet Sand with 1500 and polish with Meguiars PlastX ... 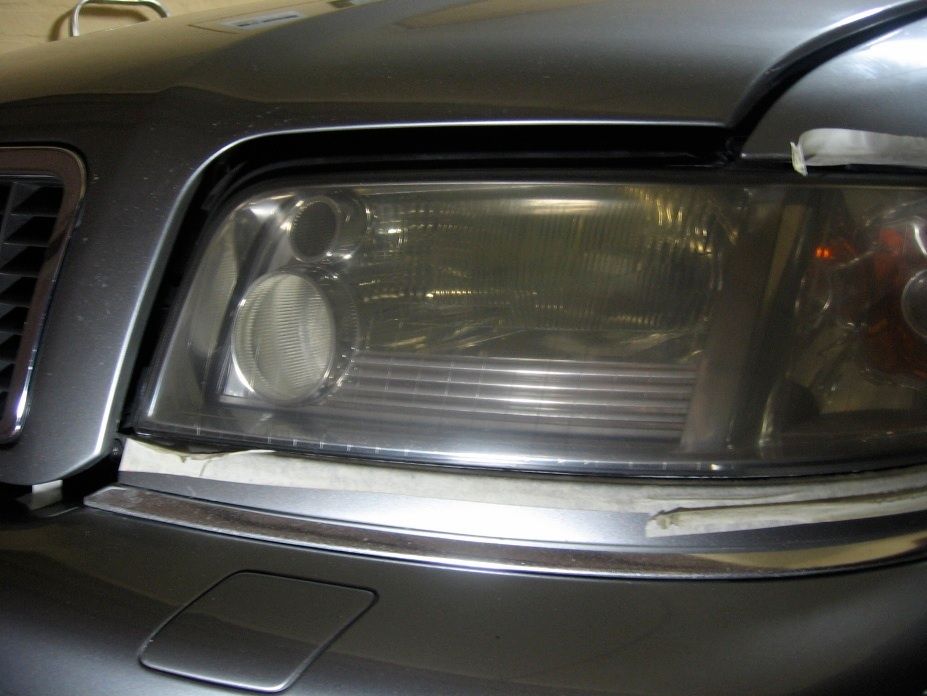 Now for the removal of the Headlamp .....
__________________
" Love the Sound of a V8....... All Day " *still wish it was a V10* 2002 S8 D2 F/L H & R Springs, Koni Coil Overs, Dastek Chip, Sport Exhaust, 19" S5 Rims, Solar Sun Roof (Cause we have Sun) and most of the Bells & Whistles. Last edited by Iyole; 1st January 2013 at 08:39 PM.
|
|
#3
1st January 2013, 09:28 PM
|
|||
|
|||
|
Step 1 .....
Remove the lower trim below the headlamp by removing the screw as indicated..... Gently pry/pull the trim out from under the Headlamp ... Take care with the rubber moulding around the trim. This moulding has securing points as indicated, located below the lower corner of the indicator lens. My rubber moulding has perished and needs to be replaced. 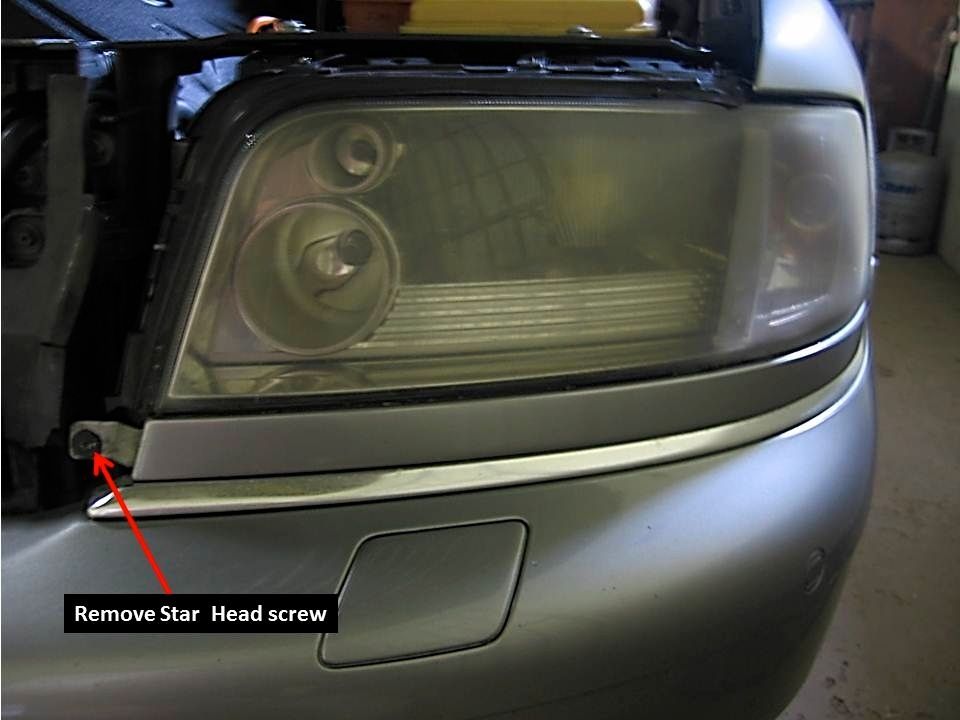 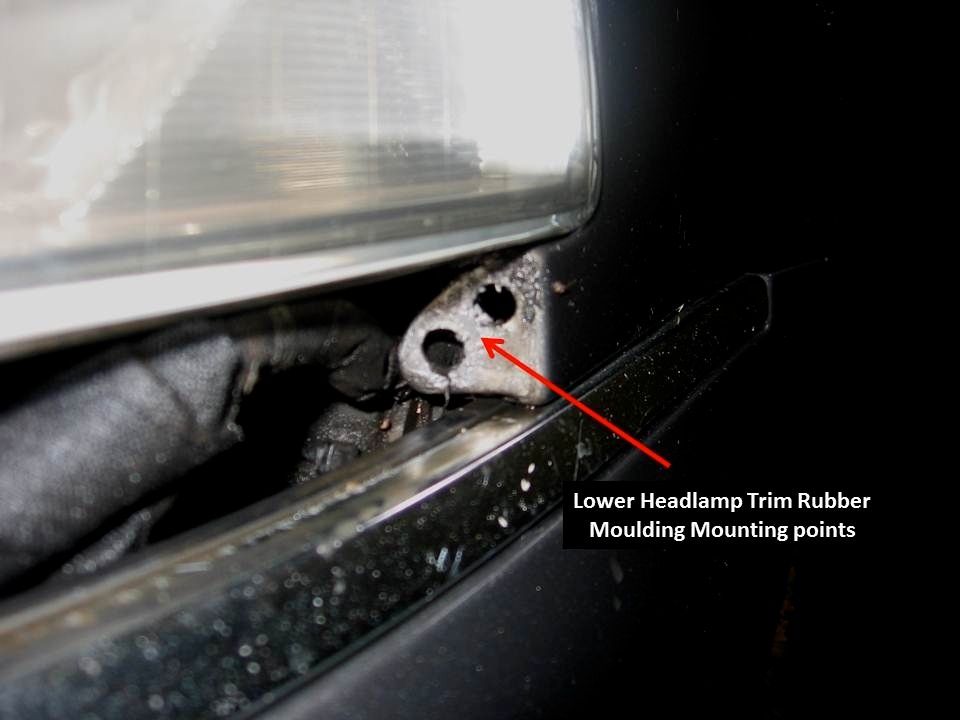 Step 2 ..... Remove the 4 mounting screws/bolts as indicated.... 2 below the Headlamp/2 on top .... 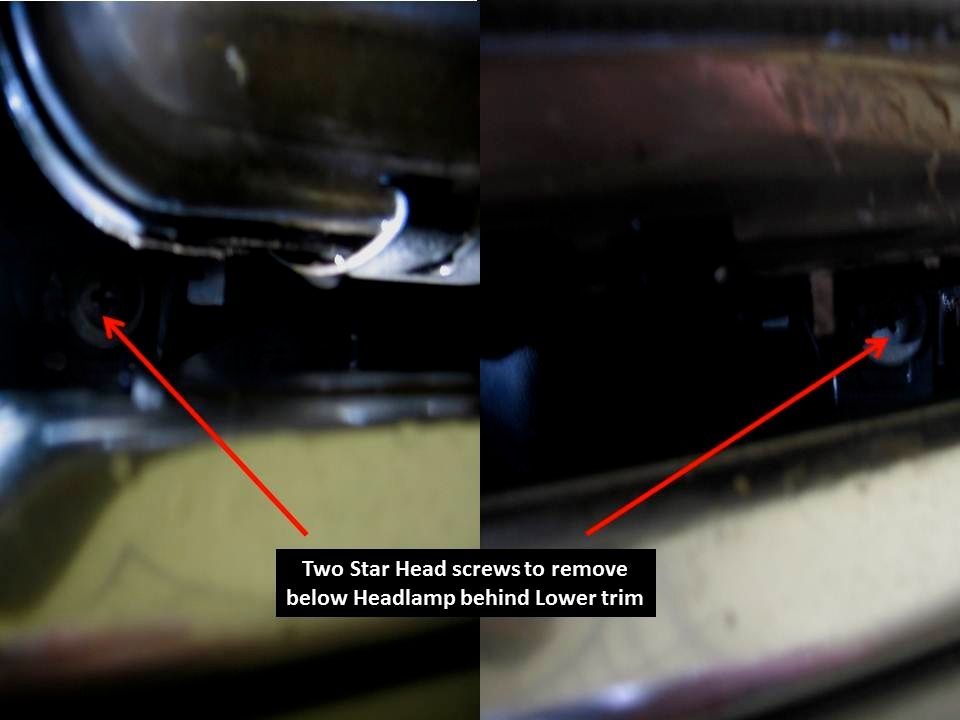 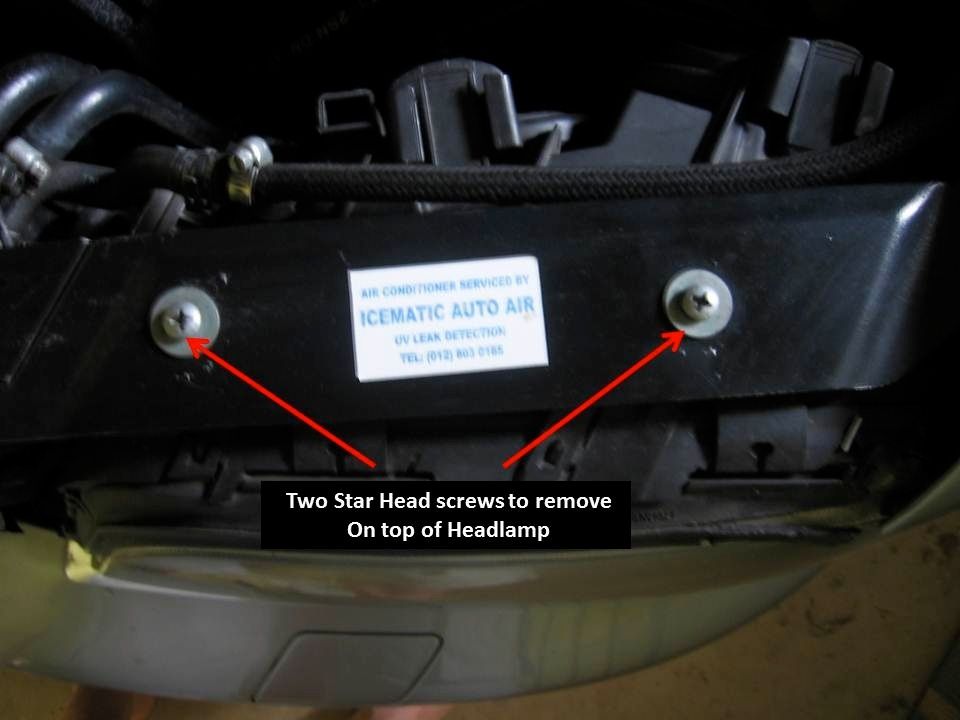 Step 3 ..... The entire Headlamp unit can now be removed from it's housing ..... TIP: .... Loosen off the Hex Bolt as indicated (alongside the Hydraulic Fluid reservoir) ..... Once loosened the upper Headlamp mounting bracket can be lifted slightly to make the removal of the Headlamp unit easier .... 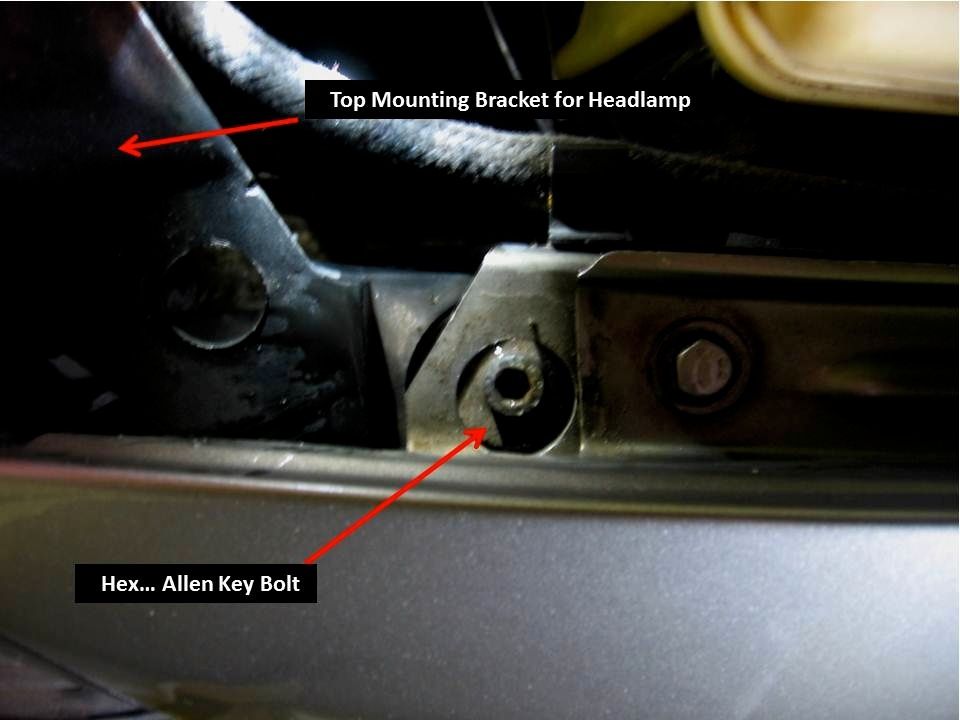 Once the Headlamp unit is removed from the body disconnect the main wiring harness and remove the Indicator bulb socket by turning anti-clockwise. The entire Headlamp unit can now be removed from the body......
__________________
" Love the Sound of a V8....... All Day " *still wish it was a V10* 2002 S8 D2 F/L H & R Springs, Koni Coil Overs, Dastek Chip, Sport Exhaust, 19" S5 Rims, Solar Sun Roof (Cause we have Sun) and most of the Bells & Whistles. Last edited by Iyole; 1st January 2013 at 09:52 PM.
|
|
#4
2nd January 2013, 07:25 AM
|
||||
|
||||
|
Nice job!
 Another task now to be added to my 'to do' list! One of my rear lenses is a bit iffy too, so the order for 'PlasticX' is on the way. Another task now to be added to my 'to do' list! One of my rear lenses is a bit iffy too, so the order for 'PlasticX' is on the way.Just one point I'm not clear about - was it just the PlasticX polish that was done with the light unit removed from the car? And why did you need to remove it when all the previous work was done in situ? Thanks for the write up.
__________________
2002 Final Edition S8. Ebony black with Silver Grey leather and myrtle wood trim. Current mods: solar sun roof, 20mm rear spacers, 15 mm on front, red brembo callipers, 6k headlights, rear view camera, engine remap, alloy dash dial rings, alloy navi rings, tt/phaeton pedal upgrade, (and custom matching foot rest) dension ipod interface & parrot hands free kit (both fully hidden), av input, tv in motion switched thro' PF switch in blanking plug right of steering column, Audi 'quattro' sill covers, repositioned centre console switches, radio clock, .Planned mods: auto-dimming rear view mirror, dash cam (as steamship's), fit the ski hatch, refit philips drl's (or maybe not - nope, definitely not - horrible botch!).
|
|
#5
2nd January 2013, 07:58 AM
|
|||
|
|||
|
Quote:
was to enable cleaning of the inner face of the outer lens and the inner lens was yellowed due to heat (not to clear on the images). I also found that all the reflectors had a Fog on them which required cleaning. Will be clarified as I get time to add to the thread. Thanks for the compliment.
__________________
" Love the Sound of a V8....... All Day " *still wish it was a V10* 2002 S8 D2 F/L H & R Springs, Koni Coil Overs, Dastek Chip, Sport Exhaust, 19" S5 Rims, Solar Sun Roof (Cause we have Sun) and most of the Bells & Whistles.
|
|
#6
2nd January 2013, 08:04 AM
|
|||
|
|||
|
Removal of Outer Lens.....
Step 1 ...... Remove the Rubber Moulding surrounding the lens taking care with the rubber pin that is inserted in the slot at the bottom left corner. I also need to replace this rubber moulding due to perishing. 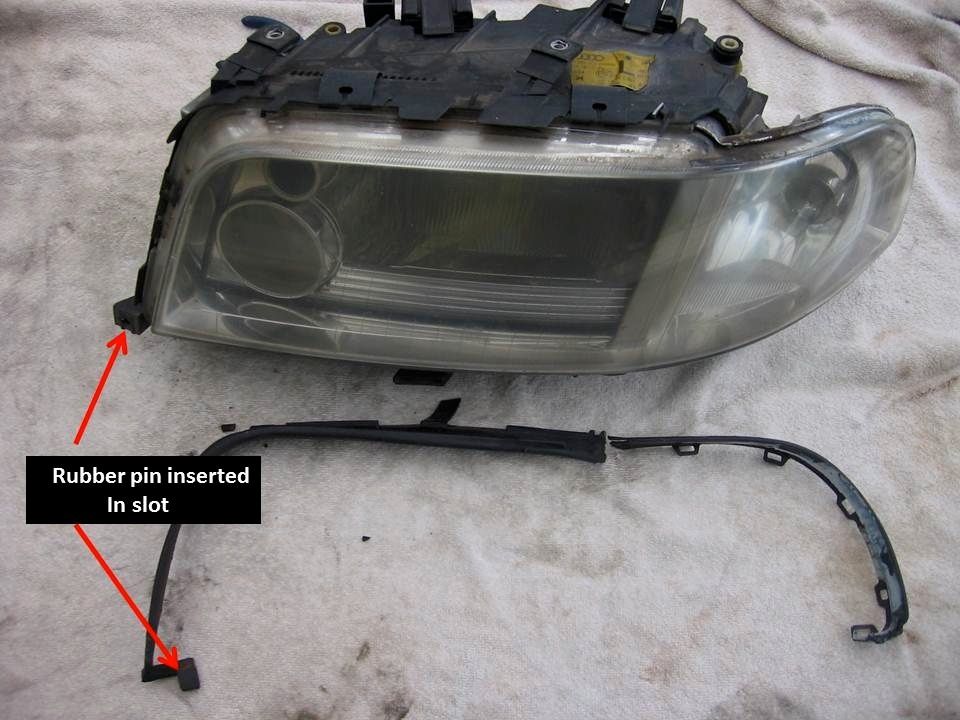 Step 2 ..... There are 8 clips that need to be removed .... they pry off relatively easily. None of the guides on the Net nor Elsa mention the clip on the rear.  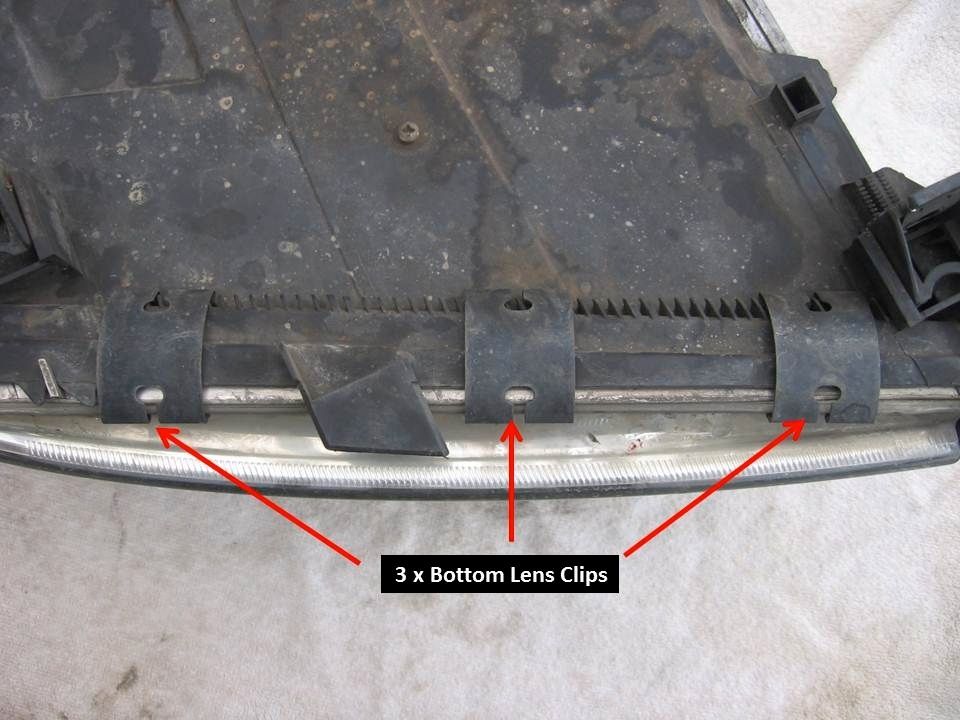 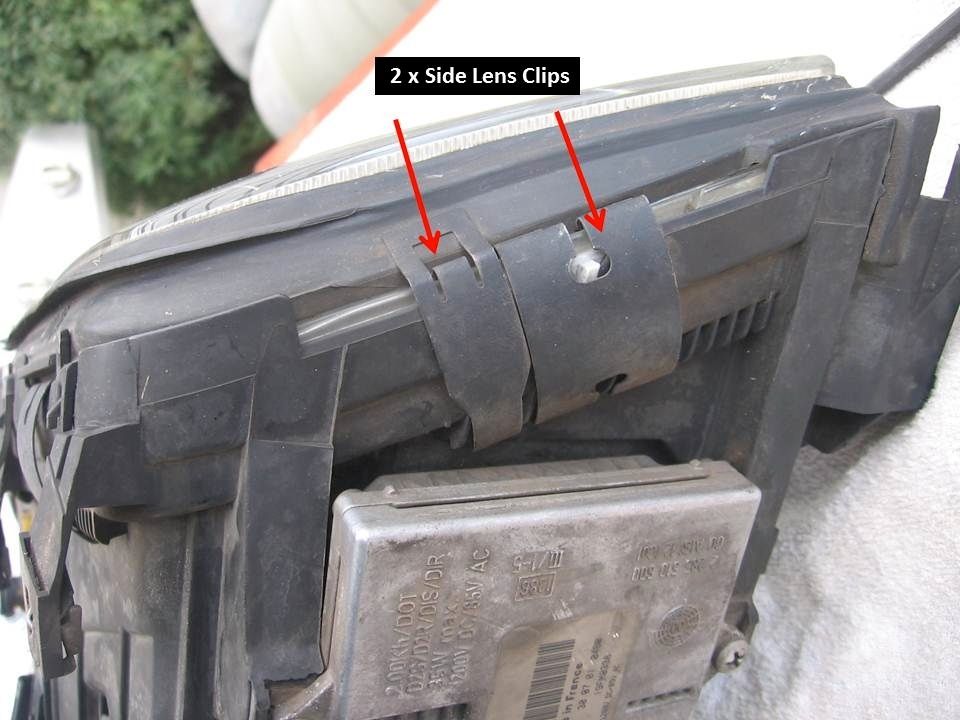 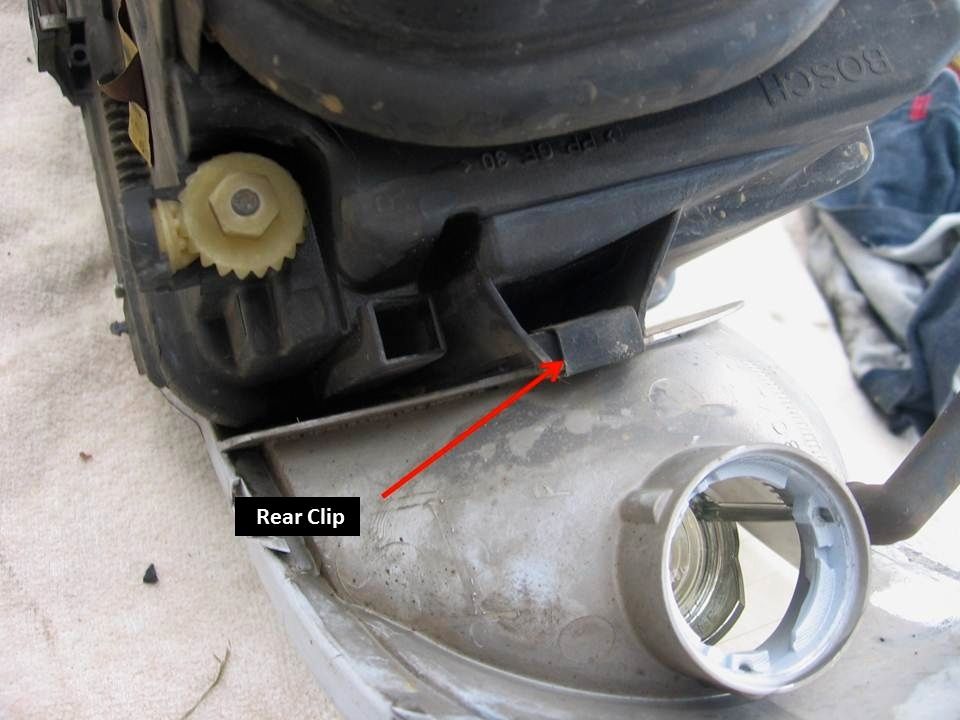 Step 3 .... Carefully pry the outer lens off the main housing .... 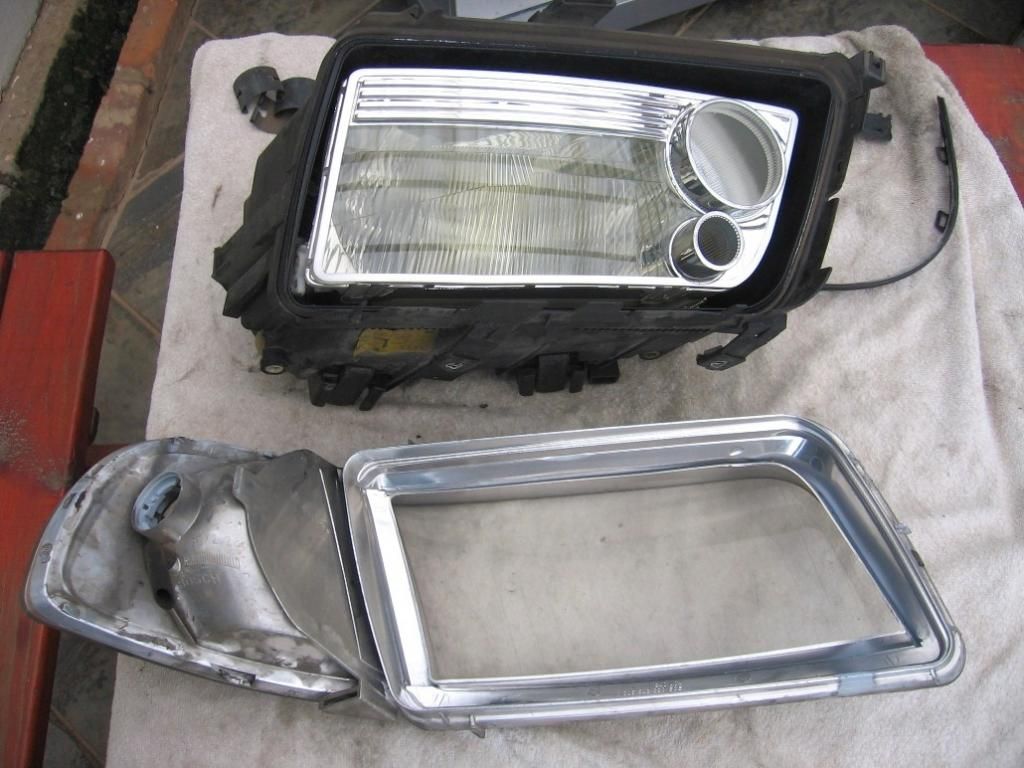
__________________
" Love the Sound of a V8....... All Day " *still wish it was a V10* 2002 S8 D2 F/L H & R Springs, Koni Coil Overs, Dastek Chip, Sport Exhaust, 19" S5 Rims, Solar Sun Roof (Cause we have Sun) and most of the Bells & Whistles. Last edited by Iyole; 2nd January 2013 at 08:22 AM.
|
|
#7
2nd January 2013, 08:27 AM
|
||||
|
||||
|
great write up and very helpful.
All I need now is a dry day....  or a garage. or a garage.
__________________
2002 D2 S8 Ming Blue, Valcona leather, Vavona wood insert, solar sunroof (to be fitted), Heated rear seats, extended leather pack, 18 Avus, ski hatch, Bose, auto dim rear view mirror, rear blind.
|
|
#8
2nd January 2013, 09:34 AM
|
||||
|
||||
|
Did this recently with my mates Saab. I never bought any fancy products but used what I had on the shelf instead. Grade 400, 800, 1200 and 2000 wet & dry, Farecla G3 and G10, then polish that has a slight cut and finish with a coat of wax. It took around 30 minutes per light leaving them in situ and the results were amazing.
Nice write up here for the A8 owners
__________________
. Nite Blue 3.0L SE Quattro 
|
|
#9
2nd January 2013, 09:58 AM
|
||||
|
||||
|
Ordered the 'PlastX'! I have the rear light unit that I've modified to take the reversing camera in a second 'boot lock' fitting awaiting installation, so I'm going to do that one first as soon as the stuff arrives. Great write up and pics - thanks!
__________________
2002 Final Edition S8. Ebony black with Silver Grey leather and myrtle wood trim. Current mods: solar sun roof, 20mm rear spacers, 15 mm on front, red brembo callipers, 6k headlights, rear view camera, engine remap, alloy dash dial rings, alloy navi rings, tt/phaeton pedal upgrade, (and custom matching foot rest) dension ipod interface & parrot hands free kit (both fully hidden), av input, tv in motion switched thro' PF switch in blanking plug right of steering column, Audi 'quattro' sill covers, repositioned centre console switches, radio clock, .Planned mods: auto-dimming rear view mirror, dash cam (as steamship's), fit the ski hatch, refit philips drl's (or maybe not - nope, definitely not - horrible botch!).
|
|
#10
2nd January 2013, 12:22 PM
|
||||
|
||||
|
Quote:

__________________
Confidence is the feeling you have before you know better . . . .  Audi A8 D2 3.7 Quattro Sport 1999 FL - Melange 2nd Place Winner - A8-Freunde Annual German Meet 2012 at Edersee 20" x 9" Bentley GTC Wheels with 385mm W12 Front Discs & Bentley Caliper Covers, Front Lowered on Coilovers, Xenons, Combined DRLs and LED Foglights to modified OEM front fog lamp position, Alcantara/Leather, Full Black Alcantara headlining + pillars and blind shelf, Bespoke Flat Bottomed Sports Steering Wheel, Dark Myrtle Wood, Autodim Mirrors, Bose, Blinds, Digital TV, Ski Hatch, Modified rear exhaust section for extra V8 Burble  Audi S8 D2 Final Edition 2002, Avus Silver with Red Leather Interior Tiptronic with Sport mode button, Sony rear entertainment package, Bose sound system, Audi Navigation Plus, 20 inch Final Edition alloys, Full Cat Back Stainless Milltek exhaust, giving a great V8 burble Audi A8L D2 4.2 Petrol with LPG - Ebony Black Audi A8L D4 FL 4.0T Petrol twin turbo - Havana Black Audi A2 1.6 FSi Sport - Dolphin Grey with Votex body kit and Red Leather Interior and some other A8's A8L's and Mercs
|
|
|
|


 Linear Mode

