
|
|
|||||||
| Daily banter For everything, and anything that doesnt fit in elsewhere |
 |
|
|
Thread Tools | Display Modes |
|
|
|
#1
 24th September 2017, 12:26 PM
|
|||
|
|||
|
Attached is the longer vid for the cam tensioner pad swap (down at the bottom of the post).
The first thing you'll probably notice is that I've got the cam locking bar in. The crank is also still locked. The reason for this is that if you do one bank at a time and don't remove the exhaust cam you never lose the timing. The official Audi procedure is to remove both cams which seems a bit excessive. Also, if you do it like this you don't actually have to remove the timing belt if you're doing the job in the car. I'm doing all the oil seals here so I'm also taking the cam cap off the exhaust cam, but if you're just doing the pads you don't need to touch that seal. Probably the single most important 'top tip' for this job is how to get the cam cap bolts loose. They're only done up to 10Nm on the V6 or 5Nm + 90° on the V8, but breaking them loose requires a substantial amount of torque - more than the average T30 tool can handle. The trick is to put the T30 tool in the bolt head (after cleaning out any crud or oil) and give it a sharp tap with a hammer. This breaks the stiction between the bolt and the threads, and it will then come out without breaking anything. It'll still go with a crack when it breaks loose, but at least it won't snap the tool! Buy the best T30 tool you can - Facom, Snapon, etc, and ideally have a sacrificial one for the hammer bit. Ideally have a couple of spares too! The manual says replace the bolts on the V8, since they're torque + degrees, but I have measured used ones against new ones and they are identical so I've stopped replacing them, saving £100-odd on the job! The V6 bolts are just done to standard M6 torque so no need to replace them. You can briefly see me marking the cam chain with nail polish - there's a TDC notch on each cam so I mark the chain exactly above that notch before I remove the cam. You can see me lift the intake cam and wiggle the tensioner out, then put the cam back in place. At no point do I remove the cam from the chain, therefore making sure I don't lose timing. You need to remove both the cam caps next to the chain to do this (ie intake and exhaust) in order for the tensioner to come out this way. I let the new pads sit in a cup of hot water before fitting them. That makes them a little more flexible and they just pop on the tensioner without any fuss. You do need to remove the tensioner compressing tool to get the top pad on. Just hold the tensioner carefully while you do this and make sure the two pistons don't fall out and it'll be fine. There is a little gauze filter in the bottom of the tensioner where it gets its oil feed from the head. Be careful not to damage this or let it drop out. Tensioner pads are on ebay here btw, including the tensioner holding tool which is very useful. I have a drawer full of them now 
Last edited by MikkiJayne; 24th September 2017 at 01:06 PM. 
|
|
#2
24th September 2017, 12:51 PM
|
||||
|
||||
|
Dean, I hope that you get all the photos (courtesy of MJ, of course) and make a picture book of this refurb.(I refrained from calling it a scrap book
 ) )
__________________
2002 D2 S8 Ming Blue, Valcona leather, Vavona wood insert, solar sunroof (to be fitted), Heated rear seats, extended leather pack, 18 Avus, ski hatch, Bose, auto dim rear view mirror, rear blind.
|
|
#3
24th September 2017, 01:13 PM
|
|||
|
|||
|
I can burn all the originals to DVD to go with the big pile of invoices

|
|
#4
24th September 2017, 01:41 PM
|
|||
|
|||
|
I took the steering rack out this morning, before cleaning the engine bay. Turns out it is servotronic which explains the light steering
") I thought it was the first time I drove it, but couldn't see it on the build sheet so concluded the mayo in the system had done something odd. Obviously it was behaving as it should all along so instead of replacing it I took all the pipework off and thoroughly flushed it with new fluid until it stopped coming out creamy. I thought it was the first time I drove it, but couldn't see it on the build sheet so concluded the mayo in the system had done something odd. Obviously it was behaving as it should all along so instead of replacing it I took all the pipework off and thoroughly flushed it with new fluid until it stopped coming out creamy.  Cleaned and re-greased the rack, as the boot had split on this end so the grease was a bit nasty  New boots, clips and tie rods ready to go back together    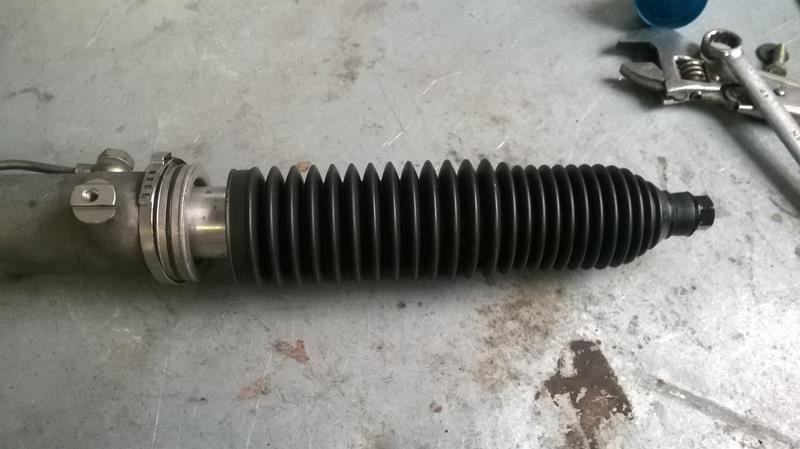 Proper boot clips crimped with the proper tool. No cable ties here!  New rod end on  Ready to go back on the car 
|
|
#5
24th September 2017, 01:48 PM
|
|||
|
|||
|
Its a 'orrible mess in here 🤢 I can't put this off any longer though so cleaning this up this afternoon...
     
|
|
#6
24th September 2017, 03:05 PM
|
||||
|
||||
|
Most of us just get in our A8s or S8s, turn the key in the ignition, start the car and drive off. These videos just go to show how much work is involved with that lump under the bonnet. I've thoroughly enjoyed reading (and watching) this thread and I'd love for my own car to be looked after in such a thorough fashion. Unfortunately, I don't live in Devon. Would love to have the opportunity of a visit to the workshop at some point when funds allow.
Thanks for keeping us all posted, MJ.
__________________
2010 B8 S5 Sportback quattro 3.0 Supercharged in Sprint Blue (current girlfriend) 2000 D2 A8L quattro 4.2 in Audi silver (my ex-girlfriend) 
|
|
#7
24th September 2017, 03:13 PM
|
||||
|
||||
|
Definitely the best thread on here in ages
I wonder how many PM's MJ has had asking for similar for other forum members 8's?
__________________
2002 S8 - Irish Green Pearl. Cat N (saved by the D2 Doctor  ) )1988 E30 Coupe - Royalblau Metallic 2003 S4 Avant - Light Silver Mettalic 2016 S5 Coupe Black Edition - Glacier White 
|
|
|
|


 Hybrid Mode
